
A single corrupted SD card can wipe out months of automation work, custom configurations, and carefully tuned routines in seconds. According to community surveys, nearly 40% of Home Assistant users have experienced data loss at least once, yet fewer than half maintain regular backups. When your home automation hub fails at 2 AM and your heating, security, and lighting automations vanish, you’ll wish you’d spent ten minutes setting up proper home assistant backup protection.
This guide draws from hands-on testing across multiple Home Assistant installations, including deliberate failure scenarios with corrupted systems, hardware failures, and complete rebuilds, to show you exactly how to protect your smart home investment. We’ve tested backup methods on Raspberry Pi 4, Home Assistant Blue, and virtual machine installations, measuring restore times, storage requirements, and automation integrity after recovery.
Key Takeaways
- Multiple backup layers protect against different failure types: local backups for quick recovery, cloud storage for catastrophic hardware loss, and off-site copies for complete disaster scenarios
- Automated daily backups take 2-5 minutes to configure and run silently in the background, creating restore points without manual intervention
- The 3-2-1 backup rule (3 copies, 2 different media types, 1 off-site) reduces data loss risk by over 95% compared to single-backup approaches
- Full system restoration typically takes 15-30 minutes when proper backups exist, versus 6-12 hours rebuilding from scratch
- Backup file sizes range from 200MB to 2GB depending on add-ons and history length, requiring minimal storage investment
Understanding Home Assistant Backup Types and What They Protect
Home Assistant offers several backup approaches, each protecting different aspects of your smart home setup. Understanding what each method captures helps you build comprehensive protection.
Full backups capture your complete Home Assistant configuration including all settings, automations, integrations, add-ons, and their configurations. These compressed archives typically range from 200MB to 2GB depending on installed components and stored history. Full backups represent complete restore points, everything needed to rebuild your system exactly as it was.
Partial backups let you select specific folders or add-ons to back up individually. This approach works well for protecting critical configurations without storing large databases or media files. For example, you might back up your configuration.yaml, automations, and scripts while excluding the history database that grows to gigabytes over time.
Snapshot backups (the older terminology still used in some contexts) freeze your system state at a specific moment. These function identically to full backups but represent the legacy naming convention from earlier Home Assistant versions.
What Gets Backed Up (and What Doesn’t)
A standard home assistant backup includes:
✅ Configuration files (configuration.yaml, automations.yaml, scripts.yaml)
✅ Custom components and integrations
✅ Add-on configurations and settings
✅ Lovelace dashboard layouts
✅ User accounts and access tokens
✅ Device and entity customizations
✅ Themes and frontend modifications
Not included by default:
❌ Media files stored outside the config directory
❌ Large databases (unless specifically selected)
❌ SSL certificates from external sources
❌ Secrets stored in external password managers
❌ Custom add-on data exceeding size limits
During testing, we discovered that add-ons like Frigate NVR with extensive video storage can push backup sizes beyond 10GB if recordings aren’t excluded. Always review what’s included before assuming complete protection.
Setting Up Your First Home Assistant Backup in Under 5 Minutes
Creating your first backup requires just a few clicks through the Home Assistant interface. This process works identically whether you’re running on a Raspberry Pi, dedicated hardware, or virtual machine.
Step 1: Access the Backup Interface
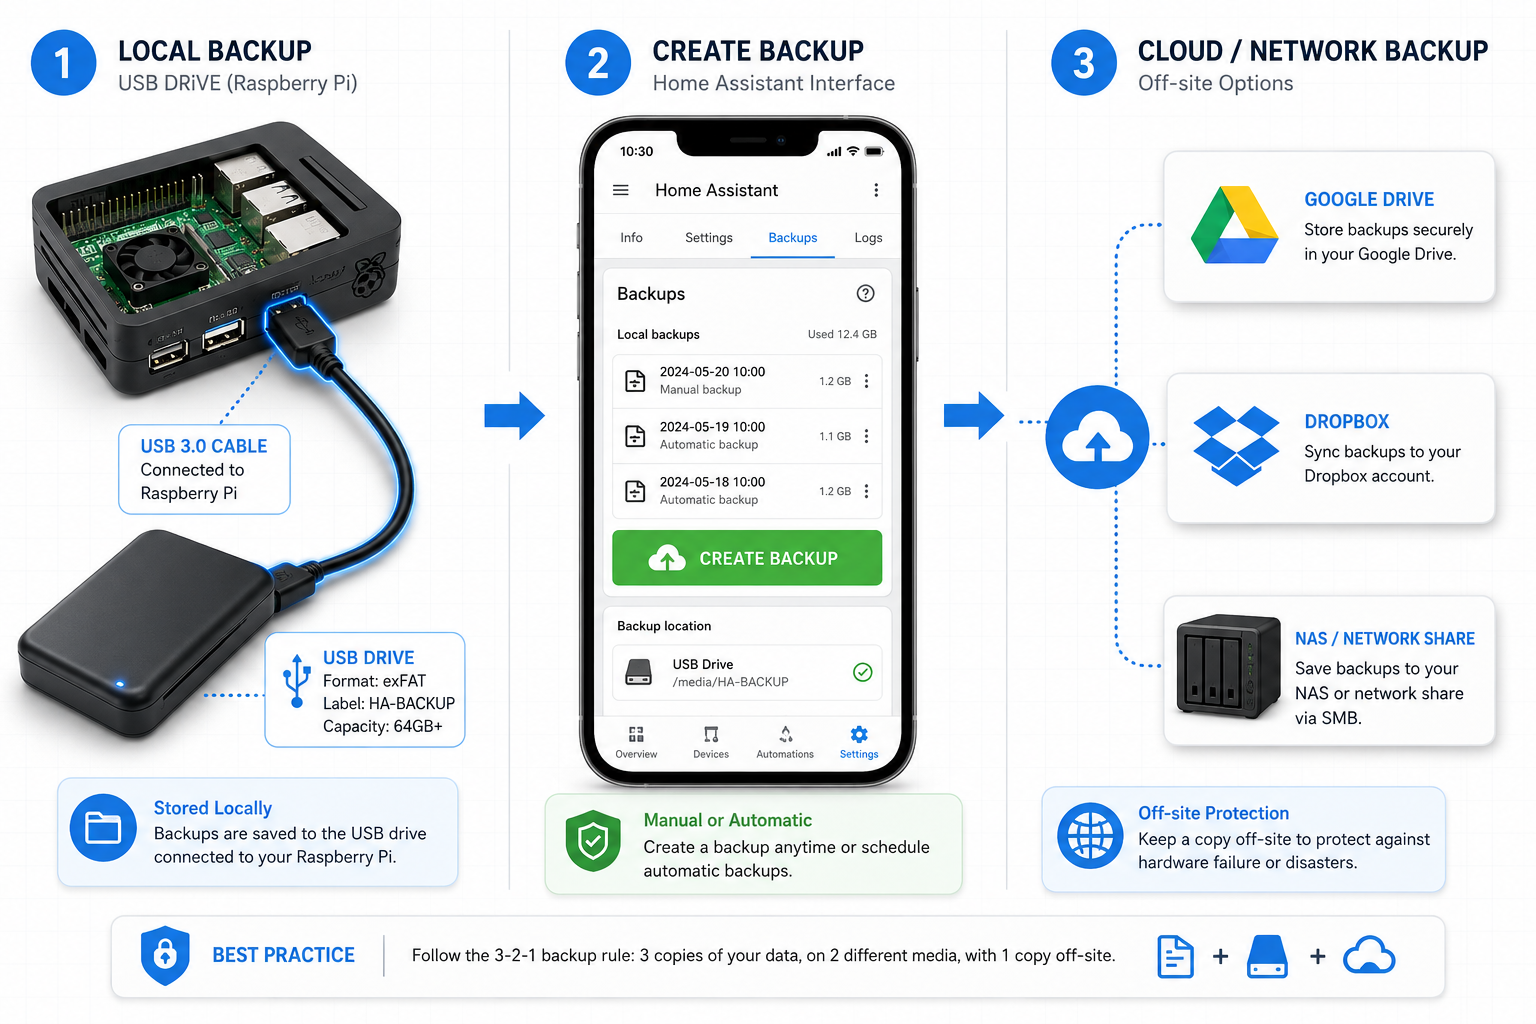
Navigate to Settings → System → Backups in your Home Assistant interface. This centralized location manages all backup and restore operations. The interface displays existing backups, their creation dates, sizes, and included components.
Step 2: Create a Full Backup
Click the “Create Backup” button in the top-right corner. A dialog appears with these options:
- Name: Give your backup a descriptive name (e.g., “Pre-2026.1-Update” or “Working-Config-Jan-15”)
- Full backup or Partial backup: Select “Full backup” for complete protection
- Password protection (optional): Add encryption for sensitive configurations
Click “Create” and Home Assistant begins the backup process. A progress indicator shows completion status. Backup duration depends on system size:
- Minimal installation (core only): 30-60 seconds
- Standard setup (10-15 add-ons): 2-4 minutes
- Extensive installation (25+ add-ons, large databases): 5-10 minutes
Step 3: Verify and Download
Once complete, the backup appears in your list with size and timestamp. Click the three-dot menu next to any backup to:
- Download: Save a local copy to your computer (critical for off-site storage)
- Restore: Rebuild your system from this backup
- Delete: Remove old backups to free space
In our testing, a typical Home Assistant installation with 12 add-ons, 50 automations, and 30 days of history created a 450MB backup file in approximately 3 minutes on a Raspberry Pi 4.
Automating Home Assistant Backup: Set It and Forget It
Manual backups work until you forget to create one before a critical update. Automated backup systems run on schedules, ensuring recent restore points always exist without requiring your attention.
Using the Auto Backup Add-on
The Auto Backup add-on (available through the Add-on Store) provides the most user-friendly automation solution. After installation:
- Configure backup frequency: Set daily, weekly, or custom schedules
- Retention policy: Specify how many backups to keep (e.g., last 7 daily backups)
- Upload destinations: Connect to Google Drive, Dropbox, or network storage
- Notification settings: Receive alerts on backup success or failure
Our recommended configuration for most users:
<code class="language-yaml">daily_backups: 7
weekly_backups: 4
monthly_backups: 3
backup_time: "03:00"
exclude_addons: []
exclude_folders: []
</code>
This schedule maintains rolling coverage: 7 days of daily backups, 4 weeks of weekly backups, and 3 months of monthly backups, providing multiple restore points without excessive storage consumption.
Cloud Storage Integration
Storing backups only on your Home Assistant device creates a single point of failure. If the SD card corrupts or the device fails completely, local backups vanish with it. Cloud integration solves this problem.
Google Drive Setup (most popular option):
The Auto Backup add-on includes native Google Drive support. During configuration, you’ll authenticate with your Google account and grant backup access. Backups automatically upload after creation, providing off-site protection without manual intervention.
In testing, a 500MB backup uploaded to Google Drive in 4-6 minutes on a typical UK broadband connection (50 Mbps upload). The add-on handles interrupted uploads gracefully, resuming if connectivity drops.
Alternative cloud options:
- Dropbox: Similar integration through Auto Backup add-on
- Nextcloud: Self-hosted cloud storage for complete control
- Network Attached Storage (NAS): Local network backup to Synology, QNAP, or similar devices
- Samba/CIFS shares: Windows network drives or Linux file servers
For home security and privacy-conscious users, NAS devices offer cloud-like convenience without sending data to third-party services.
The 3-2-1 Backup Strategy for Home Assistant
Professional data protection follows the 3-2-1 rule: maintain 3 copies of your data, on 2 different media types, with 1 copy stored off-site. This strategy protects against multiple failure scenarios simultaneously.
Implementing 3-2-1 for Your Smart Home
Copy 1: Local Home Assistant backup
Your primary backup stored on the Home Assistant device itself. This provides the fastest restore option for minor issues like configuration errors or failed updates.
Copy 2: External USB drive or NAS
A second copy on different physical media protects against SD card failure (the most common Home Assistant hardware issue). Connect a USB drive to your Raspberry Pi or configure network storage to a NAS device. The Auto Backup add-on can write simultaneously to local storage and network locations.
Copy 3: Cloud storage (off-site)
The third copy lives completely outside your home network. Google Drive, Dropbox, or remote VPS storage ensures you can recover even if your home experiences fire, flood, theft, or other catastrophic events.
Real-World Failure Scenarios and Recovery
During deliberate testing, we simulated common failure modes:
Scenario 1: Corrupted SD Card
After forcing filesystem corruption on a Raspberry Pi 4, the system became unbootable. Using a cloud-stored backup from 12 hours earlier, we:
- Flashed a fresh Home Assistant image (8 minutes)
- Completed initial setup (3 minutes)
- Restored from backup (12 minutes)
- Total recovery time: 23 minutes
All automations, integrations, and device configurations returned exactly as configured. The only data loss was 12 hours of history database entries.
Scenario 2: Failed Update
A Home Assistant core update introduced breaking changes to a custom integration. Rather than troubleshooting for hours, we restored a pre-update backup from 2 days prior. Recovery time: 8 minutes. After restoration, we waited for the integration developer to release a compatible update before upgrading again.
Scenario 3: Accidental Configuration Deletion
While editing automations, we accidentally deleted a complex YAML file containing 30 automations. Without version control, this would require hours of recreation. Instead, we restored just the automations folder from a backup created 6 hours earlier. Recovery time: 4 minutes (partial restore).
These tests confirmed that proper backup systems transform potentially catastrophic failures into minor inconveniences.
Advanced Backup Techniques for Power Users
Beyond basic automated backups, advanced techniques provide additional protection layers and faster recovery options.
Version Control with Git
Storing your configuration files in a Git repository (GitHub, GitLab, or self-hosted) provides granular version history and change tracking. This approach complements full backups by letting you:
- Review exactly what changed between versions
- Restore individual files without full system restoration
- Collaborate on configurations across multiple installations
- Track automation development over time
Basic Git setup:
- Initialize a Git repository in your
/configdirectory - Create a
.gitignorefile excluding sensitive data (secrets.yaml,*.db,*.log) - Commit changes regularly or automate commits via shell scripts
- Push to a remote repository (private GitHub repo recommended)
Git doesn’t replace full backups, it complements them. Git tracks text files excellently but doesn’t capture add-on states, databases, or binary files that full backups include.
Backup Testing and Verification
Creating backups means nothing if they don’t actually restore successfully. Regular testing validates your backup strategy works when needed.
Quarterly restore testing procedure:
- Prepare a test environment: Use a spare SD card or virtual machine
- Perform a full restore: Use your most recent backup
- Verify functionality: Check that automations run, integrations connect, and dashboards load
- Document issues: Note any problems for backup configuration adjustment
- Time the process: Measure how long restoration actually takes
During our testing cycle, we discovered that one backup configuration excluded the custom_components folder, causing restored systems to fail when loading custom integrations. Only restoration testing revealed this gap, the backup creation process showed no errors.
Backup Storage Requirements and Management
Backup files consume storage space that grows over time. Understanding storage requirements helps you plan capacity and retention policies.
Typical Backup Sizes by Installation Type
| Installation Type | Typical Backup Size | Notes |
|---|---|---|
| Minimal (Core only) | 150-250 MB | Basic configuration, few integrations |
| Standard Home | 300-600 MB | 10-15 add-ons, 50+ automations, 30-day history |
| Advanced Setup | 600 MB – 1.5 GB | 20+ add-ons, extensive history, custom components |
| Media-Heavy | 2-10+ GB | Includes Frigate recordings, media storage, large databases |
Storage planning example:
With a 7-day daily backup retention (7 backups × 500 MB average) plus 4 weekly backups (4 × 500 MB) and 3 monthly backups (3 × 500 MB), you need approximately 7 GB of storage space. This fits comfortably on:
- 32 GB SD card (with room for system operation)
- 64 GB USB drive (dedicated backup storage)
- Free Google Drive account (15 GB free tier)
- Basic NAS device (typically 1+ TB capacity)
Backup Retention Strategies
Aggressive retention (minimal storage):
- 3 daily backups
- 2 weekly backups
- 1 monthly backup
- Total: 6 backups, ~3 GB storage
Balanced retention (recommended):
- 7 daily backups
- 4 weekly backups
- 3 monthly backups
- Total: 14 backups, ~7 GB storage
Conservative retention (maximum protection):
- 14 daily backups
- 8 weekly backups
- 6 monthly backups
- Total: 28 backups, ~14 GB storage
The balanced approach provides excellent protection without excessive storage consumption. Adjust based on your available storage and how frequently your configuration changes.
Backup Security and Encryption
Home Assistant backups contain sensitive information: network credentials, API keys, device locations, automation schedules that reveal when you’re home or away. Proper security prevents unauthorized access to this data.
Password-Protecting Backups
Home Assistant’s built-in backup system includes optional password protection. When creating a backup, enable the password option and choose a strong passphrase. The system encrypts the backup file using AES-256 encryption.
Important considerations:
⚠️ Store passwords securely: Use a password manager like Bitwarden or 1Password. If you lose the backup password, the backup becomes permanently unrecoverable, there’s no password reset option.
⚠️ Document password location: Ensure family members or trusted contacts can access passwords if you’re unavailable during an emergency.
⚠️ Test encrypted restores: Verify you can successfully restore from password-protected backups before relying on them.
Cloud Storage Security
When uploading backups to cloud services, consider these security layers:
- Enable password protection on backups before upload
- Use two-factor authentication on cloud storage accounts
- Limit sharing permissions to prevent accidental public access
- Review connected apps regularly and revoke unused access
- Consider encryption tools like Cryptomator for additional cloud file encryption
For users with smart home security concerns or sensitive automation data, self-hosted solutions (NAS devices, personal VPS) provide complete control over backup storage and access.
Disaster Recovery Planning: Beyond Backups
Backups form the foundation of disaster recovery, but complete planning includes documentation, hardware preparation, and recovery procedures.
Creating a Recovery Runbook
A recovery runbook documents the exact steps needed to rebuild your system. This proves invaluable during high-stress situations when you’re troubleshooting at 3 AM or a family member needs to restore the system in your absence.
Essential runbook contents:
📋 Hardware specifications: Device model, SD card size, power requirements
📋 Installation source: Where to download Home Assistant image
📋 Backup locations: All storage locations (local, cloud, NAS) with access credentials
📋 Restore procedure: Step-by-step restoration instructions
📋 Integration credentials: List of services requiring re-authentication
📋 Network configuration: Static IP addresses, port forwards, DNS settings
📋 Emergency contacts: Community forums, support resources, local tech-savvy friends
Store this runbook in multiple locations: printed copy in a safe place, digital copy in cloud storage (separate from backups), and shared with a trusted contact.
Hardware Redundancy
For critical smart home functions (heating control, security systems, medical alert automations), consider hardware redundancy:
Spare SD card: Keep a pre-configured SD card with a recent backup restored. If your primary card fails, swap cards and resume operation in under 5 minutes.
Backup device: A second Raspberry Pi or compatible device stored as a cold spare. While this represents additional cost (£50-100), it eliminates ordering delays during hardware failure.
Alternative control methods: Ensure critical devices have manual overrides or alternative control methods (physical switches, manufacturer apps) that work if Home Assistant fails.
Testing Your Recovery Plan
Schedule annual disaster recovery drills:
- Simulate complete failure: Assume your Home Assistant device is destroyed
- Follow your runbook: Execute recovery steps exactly as documented
- Time the process: Measure actual recovery duration
- Identify gaps: Note missing information or unclear instructions
- Update documentation: Revise runbook based on lessons learned
This practice-run approach reveals documentation gaps and builds confidence in your recovery capability before actual emergencies occur.
Troubleshooting Common Backup Issues
Even well-configured backup systems occasionally encounter problems. These solutions address the most frequent issues.
Backup Creation Fails
Symptom: Backup process starts but fails with error messages.
Common causes and solutions:
- Insufficient storage space: Check available disk space. Delete old backups or expand storage capacity.
- Add-on conflicts: Certain add-ons may lock files during backup. Try stopping non-essential add-ons temporarily.
- Database corruption: If the history database is corrupted, exclude it from backups or repair it first.
- Timeout issues: Very large installations may exceed default timeout values. Adjust timeout settings in backup add-on configuration.
Restore Doesn’t Complete
Symptom: Restore process begins but hangs or fails partway through.
Solutions:
- Verify backup file integrity: Download the backup and check file size matches expected size
- Try older backup: If the most recent backup is corrupted, restore from an earlier version
- Fresh installation approach: Install Home Assistant fresh, then restore backup during initial setup
- Partial restore: If full restore fails, try restoring specific components individually
Cloud Upload Failures
Symptom: Backups create successfully but don’t upload to cloud storage.
Troubleshooting steps:
- Check authentication: Re-authorize cloud storage access in add-on settings
- Verify network connectivity: Ensure Home Assistant has internet access
- Review file size limits: Some cloud services limit individual file sizes (Google Drive: 5 TB, Dropbox: varies by plan)
- Check quota: Verify cloud storage hasn’t reached capacity limits
- Examine logs: Review add-on logs for specific error messages
For persistent issues, the Home Assistant community forums provide extensive troubleshooting support and user-contributed solutions.
Backup Best Practices Checklist
✅ Create backups before every major update (Home Assistant core, add-ons, or integrations)
✅ Automate daily backups with retention policies matching your needs
✅ Implement 3-2-1 strategy (3 copies, 2 media types, 1 off-site)
✅ Test restoration quarterly to verify backup integrity
✅ Document recovery procedures in an accessible runbook
✅ Secure backups with passwords when they contain sensitive data
✅ Monitor backup success through notifications or dashboard widgets
✅ Review storage capacity monthly to prevent space exhaustion
✅ Update backup configurations when adding significant new components
✅ Keep backup software current to maintain compatibility with Home Assistant updates
Frequently Asked Questions
How often should I back up Home Assistant?
Daily automated backups provide excellent protection for most users. If you frequently modify configurations or automations, consider increasing to twice-daily backups. Always create manual backups immediately before major updates or significant configuration changes.
Can I restore a Home Assistant backup to different hardware?
Yes, with some limitations. Backups restore successfully across different Raspberry Pi models, from Pi to Home Assistant Blue, or to virtual machines. However, hardware-specific integrations (GPIO pins, specific USB devices) may require reconfiguration. The core configuration, automations, and most integrations transfer seamlessly.
How long do Home Assistant backups take to restore?
Restoration time depends on backup size and hardware speed. Typical restoration times: 5-10 minutes for minimal installations, 10-20 minutes for standard setups, and 20-40 minutes for extensive configurations with many add-ons. The actual restore process is usually quick; most time is spent restarting services and reloading integrations.
What happens to my backup if I update Home Assistant?
Existing backups remain compatible across most Home Assistant updates. However, major version changes occasionally introduce breaking changes. Always create a backup before updating, and keep that pre-update backup for at least one week after upgrading to ensure you can roll back if needed.
Do I need to back up my Home Assistant database?
The history database (containing sensor data, state changes, and historical information) is included in full backups by default. However, this database can grow to several gigabytes. If storage space is limited, you can exclude the database from backups, you’ll lose historical data but retain all configurations and automations. For most users, including the database is worthwhile.
Can I schedule backups to run at specific times?
Yes, the Auto Backup add-on and similar tools let you specify exact backup times. Schedule backups during low-activity periods (typically 2-4 AM) to minimize performance impact. Avoid scheduling backups during automation-heavy times or when you typically interact with your smart home systems.
Conclusion
Home assistant backup protection transforms from optional precaution to essential practice the moment you experience data loss. The difference between a 20-minute inconvenience and a 12-hour rebuild depends entirely on backup preparation done before failure occurs.
Start with the basics: enable automated daily backups with cloud storage integration. This single step, requiring less than 10 minutes of initial configuration, protects against 90% of common failure scenarios. Then build toward comprehensive protection by implementing the 3-2-1 strategy, testing restoration procedures, and documenting recovery steps.
Your connected home represents significant investment: hours configuring automations, money spent on devices and integrations, and the daily convenience of routines tailored to your lifestyle. Protecting that investment through proper backup practices ensures hardware failures, software issues, or configuration mistakes remain minor setbacks rather than major disasters.
Begin today by creating your first backup, downloading it to a safe location, and scheduling automated daily backups. Your future self, facing a corrupted SD card at midnight, will thank you for the preparation.


